Easy Lemon Scones
on Apr 16, 2020, Updated May 25, 2023
This post may contain affiliate links. Please read our disclosure policy.
Citrus zest is the wonderful ingredient that gives these simple lemon scones their lovely flavor. One of the best parts about this recipe is that it they are easy drop scones. You don’t need to do any shaping for them to turn out crumbly, which is how a good scone should be. That’s a total compliment for scones.
You can add berries and make Lemon Blueberry Scones too.

Table of Contents
Why You’ll Love This Recipe
You don’t have to use a biscuit cutter or shape the dough into wedges. This is a drop scone recipe. They all turn out a little bit different with their bumpy and cracked outsides.
You can make the dough ahead of time and keep it in the fridge, or you can freeze it. In this recipe there are several steps where you can pause and put the dough in the fridge to wait to bake it. You also can freeze it to save it longer. Scones can be frozen baked or unbaked, so you have a lot of options.
I love lemon zest, but you can substitute with other varieties of citrus. Try lime zest, orange zest or use a combination of all three.
What is a Scone?
Originally from Scotland, scones are a favorite tea time treat in Great Britain. You can eat them with coffee too. They have similar ingredients to American biscuits, and you make them in a similar way. Scones are fluffy in the middle and have a good crust on the outside. They are crumbly in the best way.
Scones are not too sweet, but they tend to be a little sweeter than American biscuits that you would serve as a savory breakfast or dinner roll. Serve scones for breakfast, brunch or a mid-morning or afternoon snack.
The Ingredients
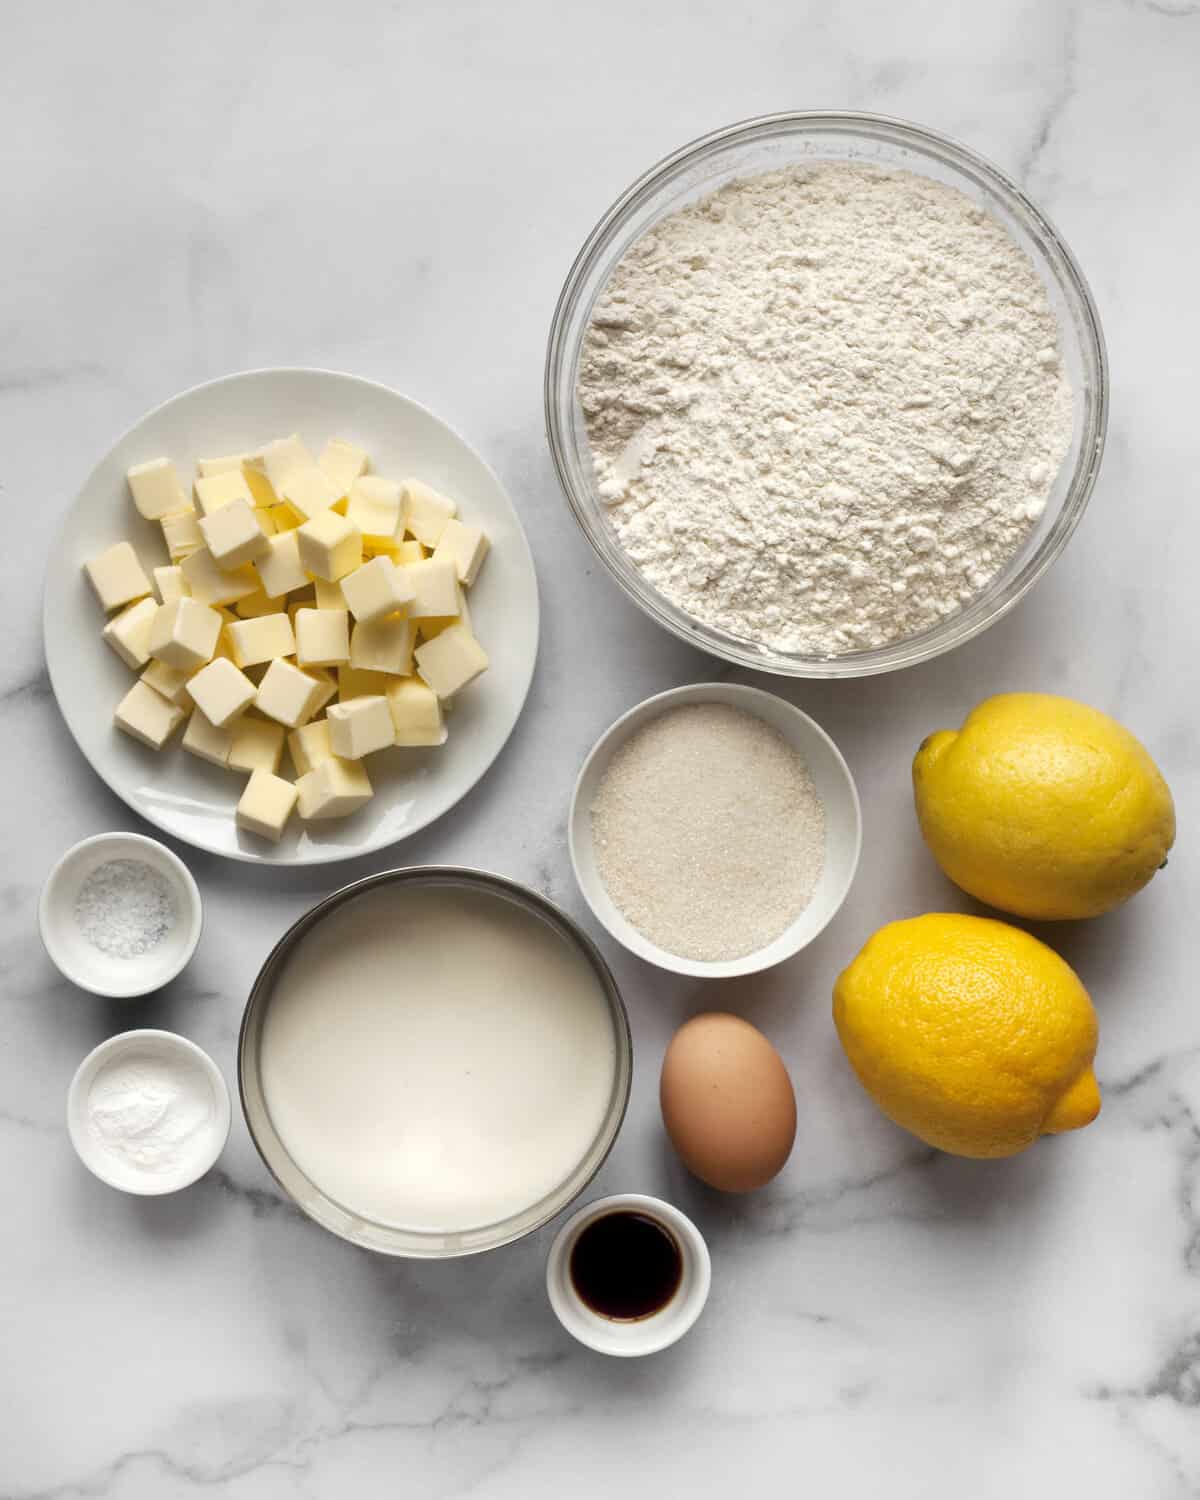
This is what you need:
- Flour: You should use basic all-purpose flour. This will give your scones a tender, layered crumb on the inside.
- Butter: It is very important that your unsalted butter is chilled and firm. Unlike cookies where you cream the butter and sugar, with scones you cut or rub the butter in smaller pieces into the flour. This is why you need cold butter.
- Lemon zest: I zest 2 lemons for the dough, so the scones turn out very citrusy. Do not use lemon extract. Fresh lemon zest will give you the best lemon flavor.
- Sugar: The scones are lightly sweetened with granulated sugar.
- Baking powder is the leavening agent that helps the scones rise.
- Salt: For sweet and savory recipes, salt brings out the overall flavor. You don’t need that much.
- Egg: You whisk one large egg with the rest of the wet ingredients before pouring them into the dry ingredients.
- Milk: You can use any type of milk from skim to reduced fat to even oat milk. Some scone recipes use heavy cream, but since I usually don’t have that in my kitchen, I never do.
- Vanilla extract gives the scones a hint of vanilla flavor. It is subtle, but I like how it rounds out the citrus.
Optional Lemon Glaze
I love these scenes without any sort of decoration, but you can use lemon juice to make a glaze that will add something sweet and lemony.
Just whisk 1 tablespoon fresh lemon juice with 1/2 cup powdered sugar until it is a pourable consistency. You might need to add a little more juice or sugar so that you can spoon on the glaze. Make sure to let the scones cool completely before you drizzle them with icing.
How To Make Lemon Scones
Preheat the oven to 400 degrees F. Line 2 baking sheets with parchment paper.
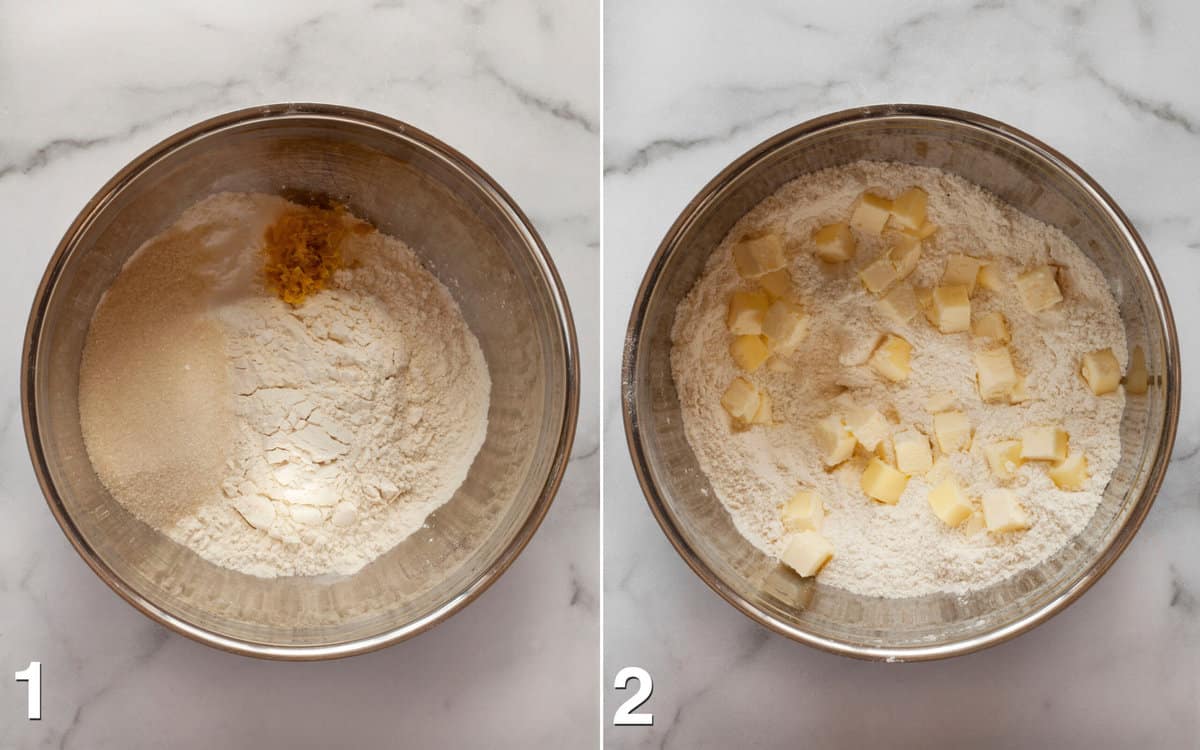
1. Stir the dry ingredients in a large bowl including the flour, sugar, baking soda, salt and lemon zest.
2. Cut the butter into the flour mixture. Use a fork or a pastry blender (also known as a pastry cutter) to push the cold cubed butter into the flour. You should end up with are pea-sized clumps or big coarse crumbs throughout the flour. Those pieces of butter mixed into the dough will release steam while they bake and give the scones their layered crumb.
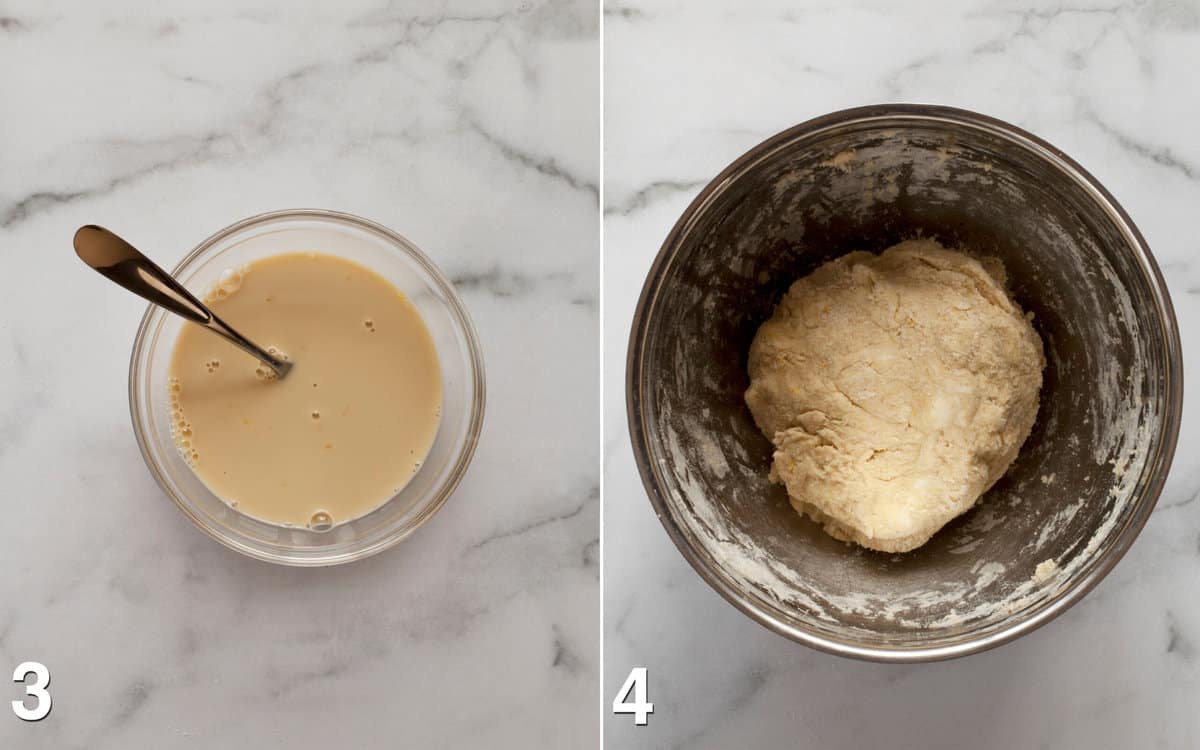
3. Whisk together the wet ingredients including the egg, milk and vanilla extract in a separate bowl.
4. Pour the wet ingredients into the dry ingredients. Stir until the dough becomes shaggy. Press it together into a ball. If you do this in a large mixing bowl, you don’t need to turn it out onto a lightly floured work surface. It can all stay in the bowl.
5. Scoop the dough onto the baking sheet. I like using a cookie scoop to do this, but you can also do it with your hands. The balls should be a heaping 1/4 cup to 1/3 cup full of dough. Brush the scones with milk before you bake them. This will help them brown.
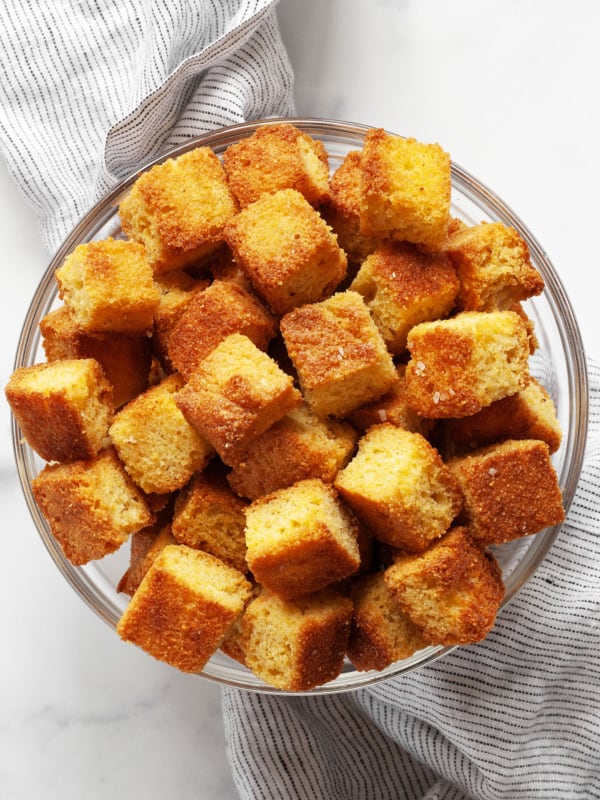
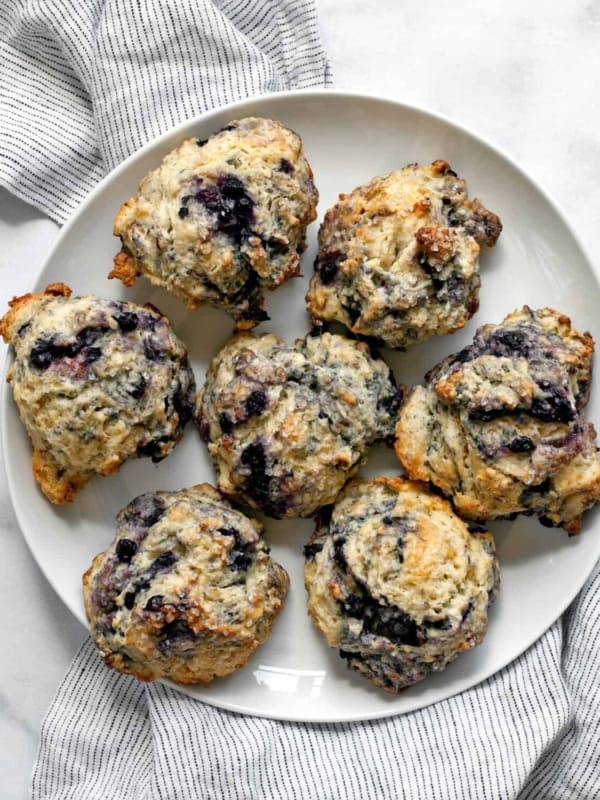
6. Bake the scones until they are light golden brown and cracked on the top, about 18-20 minutes. Cool them on a wire rack.

Serving
Enjoy the scones warm or at room temperature. Make sure to give them time to cool off. This allows the outside to get a bit crustier and have more texture. You will miss out on this if you eat them hot straight from the oven.
Storage & Freezing
Scones are best eaten the day you bake them. They are very easy to freeze unbaked. Scoop the dough onto a sheet pan lined with parchment or waxed paper. Then freeze them. Once they are frozen, you can put all the scone balls in the same container. Then you can bake them whenever you want one.
If you bake the entire batch, store them up to 2 days in an airtight container at room temperature. Bake them in a 300-degree F oven for a few minutes to get back the outside crust.
If you freeze baked scones. Thaw them in a 325-degree F oven for 12-14 minutes.
Recipe Tips for the Best Scones
The butter has to to be cold. Or it will be a challenge to cut into the dry ingredients. There should be small clumps of flour-covered butter before you stir in the wet ingredients.
Be careful not to overwork the dough. When the dough is shaggy, just press it together with your hands. If you over-mix it, the scones won’t rise as high and they will be tough.
You can make the dough up to 3 days ahead of baking them. Keep the dough in the bowl in the refrigerator and cover it. Or portion out the dough before you refrigerate it.
Take advantage of freezing scone dough. Freshly baked scones have the best flavor and texture, so think about how many you are going to eat at once before you bake all of them. I like to keep a bag of frozen portioned out scone dough in my freezer. Then I can have a baked scone even on weekday mornings.
More Scones Recipes
Easy Lemon Scones

Ingredients
- 3 cups all-purpose flour
- 3 teaspoons baking powder
- 1/3 cup granulated sugar
- 1/4 teaspoon kosher salt
- Zest 2 lemons
- 6 ounces 1-1/2 sticks chilled unsalted butter, cubed
- 1 large egg
- 3/4 cup milk plus more for brushing tops
- 1 teaspoon vanilla extract
Save this recipe
Get it sent to your inbox plus new recipes every week.
Instructions
- Preheat the oven to 400 degrees F. Line 2 sheet pans with parchment paper.
- In a large bowl, stir together the all-purpose flour, baking powder, granulated sugar, salt and lemon zest.
- Use a fork to cut the butter into the dry ingredients, until it resembles pea-sized clumps. You can also rub the butter and flour together with your fingers.
- In a small bowl, whisk together the egg, milk and vanilla extract. Stir into the flour-butter mixture. The dough will turn into clumps. Then you can press it together.
- Drop the dough by 1/4 to 1/3-cup-full in mounds on the sheet pans spreading 3 inches apart. It is easy to do this with a cookie scoop.
- Brush the tops with milk.
- Bake until golden brown, about 18-20 minutes.
- Cool the scones on a wire rack.
Notes
Nutrition
Nutrition information is automatically calculated, so should only be used as an approximation.


These look so yummy! Do you think they’d work with gluten-free flour? Thanks!